Buying floor trim and molding
In keeping with our effort to Keep It Simple, we have compiled a one page summary of all things related to molding for laminates, luxury vinyl tile and hardwood flooring. This is not meant to be a complete read, but more like a guide to help you make some fundamental decisions and focus more on the look and feel that you are after.
Background
Understanding which molding or transition pieces are required to complete a flooring project can be confusing. We hope to clear this up on this page. Some molding is required to cover required gaps in an installation and some is just for cosmetic purposes. Floors expand and contract with the environmental temperature. Proper installation requires placement of gaps in the floor at the edges and between rooms to accommodate expansions. Some of the modeling below elegantly covers these gaps.
General Molding & Trim Information
Wood moldings differ from laminate moldings. And to make things more complicated modeling differ among manufacturers. Moldings and transition pieces offered by manufacturers are often designed to match the color of a specific floor that they offer. It's important to understand that moldings may not match floors exactly because wood is a natural product, and one piece can take a stain a little differently than another. Typically molding lengths are 78 inches but can be up to 96 inches. This variation can differ from brand to brand in the industry. Laminate trim is typically made from of synthetic plasticized composite. The matching color and visual design is laminated onto the surface. a
Watch-outs
The following descriptions offer a basic guideline for the most popular molding and transition types. Dimensions and profiles may differ slightly from manufacturer to manufacturer, and the general descriptions below are meant only for general guidance. Call, chat or send and email to us if you have specific questions.
Shipping Molding
Shipping molding is done in a big long cardboard tube packaging. It is efficient for shipping a bundle of moldings, however returning single sticks that are leftover from a project can be costly and not worthwhile. The rule of thumb is to measure twice order once, keep some extra for future repairs and modifications.

Expansion Gaps
Almost all molding is designed to cover up expansion gaps in flooring in a durable and functionally cosmetic way. Expansion gaps are spaces left around the perimeter of rooms i.e. walls, against fixed objects such as columns, and other flooring transitions. The composition of the solid dictates the amount of expansion that will be observed. For example, stone floors may expand less than wood.
Wood flooring is an organic (once living) material that reacts to moisture and temperature changes in the environment. The individual fiber cells in the hardwood will take on or absorb moisture when the relative humidity is high, or when exposed to water. Expansion takes place, and the hardwood elongates across the grain or width of the plank. Conversely, when air moisture levels decrease, moisture content evaporates, shrinkage occurs.
You will need to let a floor acclimate to a room 48 hours prior to installing it so that the expansion/contraction is in sync with the gap allowances you build into the installation to ensure that is is reflective of the actual floor surface area at room temperature.
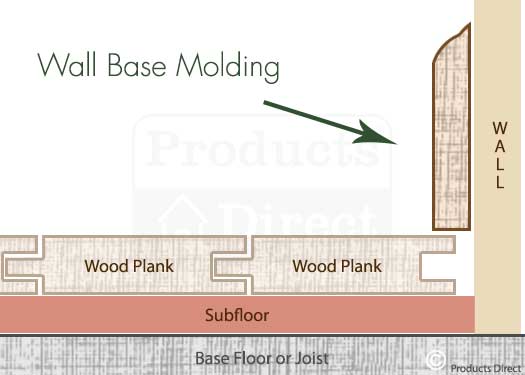
Wall Base Molding for Floor Wall Transitions
Another traditional molding used to cover expansion gaps is a Wall Base or commonly called baseboard. Wall Base heights differ from manufacturer to manufacturer but typically can range anywhere from 2 inch to 5 inch tall. Wall Bases can be plain and generic or very decorative and, like the Quarter Round, homeowners usually prefer these moldings to be painted or stained the same color as the rest of the trim in the room.
Wall Baseboards are fastened using 8 penny finish nails, nailing approximately every 16 inch and can be used with a Quarter Round complement or without.
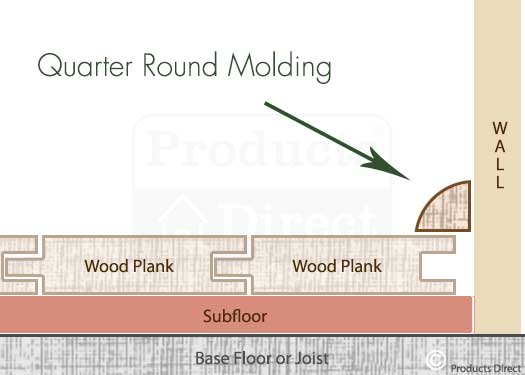
Quarter Round Molding for Floor Wall Transitions
One of the most common types of molding is called the Quarter Round. Quarter Rounds are typically 3/4 x 3/4 inch and are used to cover the necessary expansion gap between a hard surface floor and a wall. Along the same line as Quarter Rounds, some manufacturers offer a molding called a Shoe Base. Shoe Bases are typically a little thinner or a little shorter, but work in the same manner as a Quarter Round. Manufacturers offer Quarter Round to match (as close as possible) the color of their specific floor, however it is common to see Quarter Rounds painted or stained the same color as the rest of the trim in the room.
Installation of Quarter Round is very simple and is something anyone can do. Simply nail the Quarter Round into the baseboard or the wall using 6 penny finish nails approximately every 10 inch. When preparing a room for a new installation, it is necessary to remove existing Quarter Round prior to installing the new flooring. Quarter Round can be used alone, or it can be used in conjunction with a Wall Base i.e. baseboard.
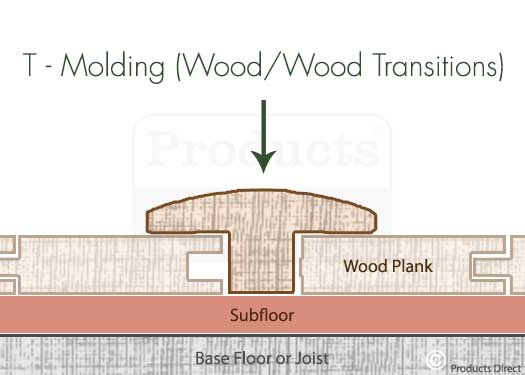
T–Molding Wood / Wood Floor Transitions
T-Moldings are appropriately named as the profile resembles a capital T. The T-Molding is used in situations where you're transitioning from one hard surface to a second hard surface. The top part of the T-Molding overlaps both hard surfaces. It's incredibly important that these two hard surfaces are the same height, as, if one side doesn't have the appropriate support, that side of the molding will start to crack once it's being stepped on. The same reasoning goes for why the T-Molding can not be used to transition to carpet, there's just not enough support.
If hardwood flooring is being floated across a few rooms, it's always recommended to use T-Moldings in doorways. In larger areas, an expansion joint is also recommended if floating hardwood flooring layout is going to exceed 30 feet in any particular room.
To install a T-Molding, a space needs to be left between the two hard surfaces. The transition piece is then glued down where it meets the subfloor using construction adhesive. It's recommended to place a heavy object on the newly glued T-Molding overnight, in order to ensure a tight bond. In addition to being glued down, you can also choose to face nail the T-Molding (in the middle of the T-Molding) to the subfloor using 8 penny finish nails. It might be helpful to drill a pilot hole slightly smaller that the nail.
Consult the manufacturer's installation instructions for the best results.
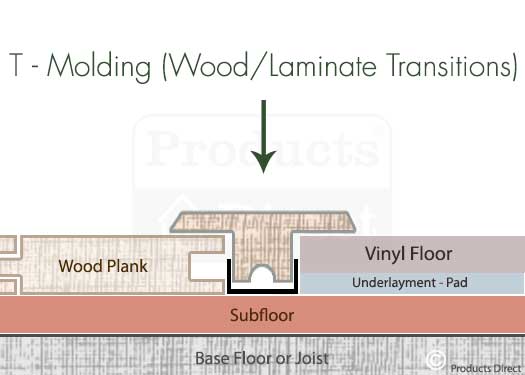
T–Molding Wood / Laminate Floor Transitions
The T-Molding top overlaps both hard surfaces, in this case, a wood floor and a laminate floor. The top of the mold will conceal the gap required to let a the two floors expand. It must be stress the two hard surfaces should be the same height. This T-molding uses an anchor channel to transfer traffic weight loads. This may offer some considerations between uneven floors, but care should be taken because if one side doesn't have the appropriate support because that the ridge of the T-molding may start to crack once it's being stepped on.
If hardwood flooring is being floated across a few rooms, it's always recommended to use T-Moldings in doorways. In larger areas, an expansion joint is also recommended if floating hardwood flooring layout is going to exceed 30 feet in any particular room.
To install a T-Molding, a space needs to be left between the two hard surfaces. This transition design relies on a metal track that is nailed or screwed to the floor between the two hard surfaces. The T-molding is then snapped into place. This method is glueless and makes installing a floating floor quicker since there is no glue drying time.
Consult the manufacturer's installation instructions for the best results.

T–Molding Laminate / Laminate Transitions
The top part of the T-Molding overlaps both hard surfaces, in this case, a laminate floor and a laminate floor. The top of the mold will conceal the gap required to let a the two floors expand. It must be stressed the two hard surfaces should be the same height. This T-molding uses an anchor channel to transfer traffic weight loads and hold the trim in place.
If hardwood flooring is being floated across a few rooms, it's always recommended to use T-Moldings in doorways. In larger areas, an expansion joint is also recommended if the floating flooring layout is going to exceed 30 feet in any particular room.
To install a T-Molding, a space needs to be left between the two hard surfaces. This transition design relies on a metal track that is nailed or screwed to the floor between the two hard surfaces. The T-molding is then snapped into place. This method is glue-less and makes installing a floating floor quicker since there is no glue drying time.
Consult the manufacturer's installation instructions for the best results.

Flush Reducer Molding Wood Floor Transitions
When you're installing a hardwood floor using a nail, staple or glue-down installation, a Flush Reducer can be used to smoothly transition the new hardwood floor down to a second flooring type, such as vinyl, ceramic tile or low pile carpet.
Flush Reducers can be glued to the subfloor with construction adhesive and/or face nailed using 8 penny finish nails. A Flush Reducer should only be used with flooring that is secured to the subfloor (nailed, stapled or glued down) and not with a hardwood floor or laminate floor that is being floated. This is because a floating floor needs room to move and a Flush Reducer would not allow for the necessary expansion gap.
Consult the manufacturer's installation instructions for the best results.

Overlap Reducer Molding Wood Floor Transitions
While installing a floating floor, it's especially important to leave expansion gaps where the new flooring meets up with walls or with a second floor. Overlap Reducers were created for the purpose of transitioning smoothly from this floating floor to a second floor like vinyl, tile or low pile carpet. Much like a Flush Reducer, an Overlap Reducer gradually slopes down to meet the second floor, but instead of locking in flush with the hardwood, an Overlap Reducer has a small protruding piece which will overlap the floating hardwood or laminate flooring. The purpose of this overlap portion of the transition piece is to hide the expansion gap left, allowing the floating floor to move without restriction.
To install an Overlap Reducer, simply glue down to the subfloor using construction adhesive and/or you can face nail into the subfloor using 8 penny finish nails. Do not adhere the Overlap Reducer to the actual hardwood or laminate flooring at all. The overlap part of this transition piece is meant to simply rest on the floating floor.
Consult the manufacturer's installation instructions for the best results.
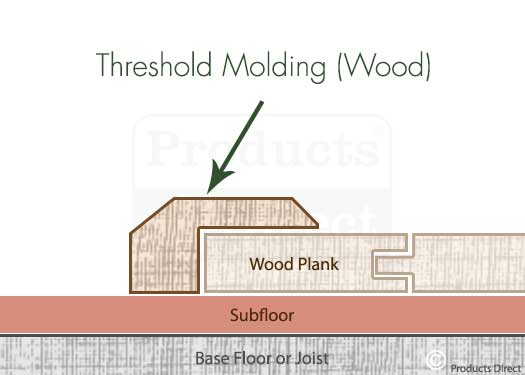
Threshold Molding Wood Floor Transitions
Threshold Molding is used in situations where a hardwood or laminate floor is meeting up with a second floor of a different height. Instead of a gradual slope, like a Reducer, a Threshold has a rounded off square edge appearance. Thresholds are perfect when butting a hard surface floor up to a high pile carpet and are also often used when hardwood or laminate floors are meeting up with a sliding glass door track. A Threshold will overlap the hardwood or laminate floor and create a defined transition to this second surface. Threshold molding is sometimes referred to as Baby Threshold.
To install a Threshold, simply glue down to the subfloor using construction adhesive and/or you can face nail to the subfloor using 8 penny finish nails. It's important to note that if you're using a Threshold with a 3/4 inch. thick solid hardwood floor, the bottom of the molding may rest at approximately 1/4 inch. above the subfloor. The Threshold can still be used. You would just need to use a heavier bead of construction adhesive or use a filler piece on the subfloor under the bottom of the molding to offer more support to the Threshold.
Consult the manufacturer's installation instructions for the best results.
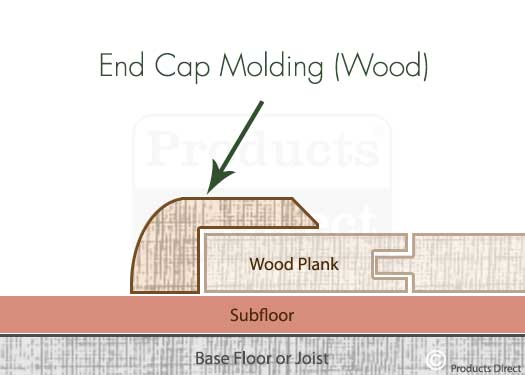
End Cap Molding Wood Floor Transitions
Square Nose Reducers are very similar to Thresholds but have a more squared off edge. Typically used with floating floor, a Square Nose is perfect for butting hard surface floors up against vertical obstacles, where a Quarter Round or Wall Base would be difficult to use to cover an expansion gap like a brick wall, fireplace, sliding glass door, entryway doors. The Square Nose Reducer overlaps the hardwood or laminate floor, hiding the expansion gap with the overlapped portion of the molding.
Installation of a Square Nose Reducer would involve using construction adhesive to glue the transition piece to the subfloor and/or face nailing the piece to the subfloor using 8 penny finish nails.
Consult the manufacturer's installation instructions for the best results.
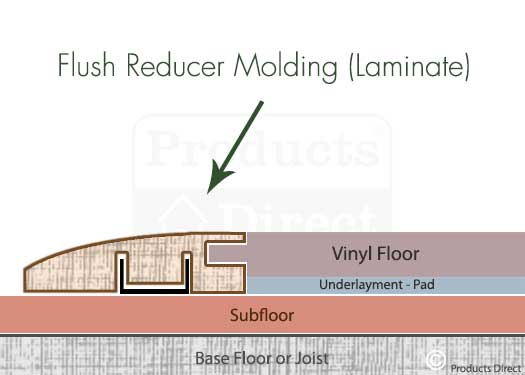
Flush Reducer Molding for Laminate Floor Transitions
Floating floors that need a surface terminator that function as a fixed anchor too can used a Flush Reducer molding (if available). These are less common in the marketplace. The tongue and grove would fit into the reducer and the reducer would be fasten to the floor. Any expansion in the floor would be away from the molding since there is no "gap" in the molding transition. It has the benefit of a smooth floor transition, versus an overlap reducer which protrudes above the floating floor.
This molding will reduce the height of the floor from the height of the floating floor to the subfloor level. If you have just half covered room with a floating floor or the floor stops in a doorway for example you can use Flush Reducer molding to finish the job. Flush reducers reducers do not accommodate expansion of the floating floor and are therefore not widely used for installations. Availability is subject to manufacturer.
To install a Flush Reducer molding, an anchor track is required. This molding design relies on a metal track that is nailed or screwed to the floor between. The molding is then snapped into place. This method is glueless and makes installing a floating floor quicker since there is no glue drying time. The floating floor can then be click locked into the molding. Check the installation guidelines of the manufacture for full details.
Consult the manufacturer's installation instructions for the best results.
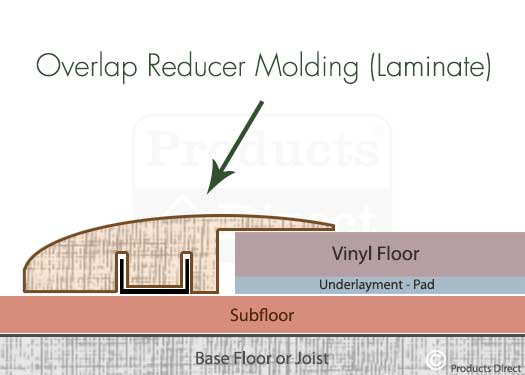
Overlap Reducer Molding for Laminate Floor Transitions
Floating floors can utilize a surface terminator called a reducer. It will reduce the height of the floor from the height of the floating floor to the subfloor level. If you have just half covered room with a floating floor or the floor stops in a doorway are examples where you can use Overlap Reducer molding to finish the job. Proper installation requires a gap which can allow for the required expansion of the floating floor. Overlap reducers have a small protruding piece which overlaps the floating floor and hides the expansion gap, leaving room for free movement of the floating floor.
To install a Overlap Reducer-Molding, a space needs to be left at the edge the floor hard surface. This molding design relies on a metal track that is nailed or screwed to the floor between the two hard surfaces. The molding is then snapped into place. This method is glueless and makes installing a floating floor quicker since there is no glue drying time. Check the installation guidelines of the manufacture for full details.
Consult the manufacturer's installation instructions for the best results.
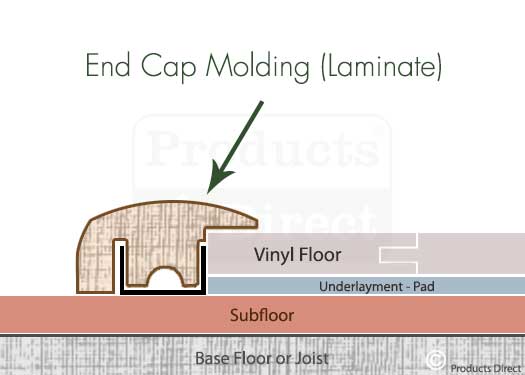
End Cap Molding for Laminate Floor Transitions
Square Nose Reducers are very similar to Thresholds but have a more squared off edge. Typically used with floating floor, a Square Nose is perfect for butting hard surface floors up against vertical obstacles, where a Quarter Round or Wall Base would be difficult to use to cover an expansion gap like a brick wall, fireplace, sliding glass door, entryway doors. The Square Nose Reducer overlaps the hardwood or laminate floor, hiding the expansion gap with the overlapped portion of the molding.
Installation of a Square Nose Reducer would involve using construction adhesive to glue the transition piece to the subfloor and/or face nailing the piece to the subfloor using 8 penny finish nails.
Consult the manufacturer's installation instructions for the best results.
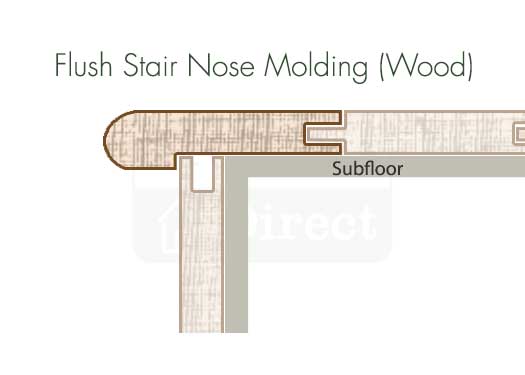
Flush Stair Nose Molding for Wood or Laminate Floors
With flush stair nose molding the tongue and groove configuration is used to secure the nose to the floor overlay and the stair underlayment. This offers a smooth surface transition between the stair nose and the floor. In ideal situations the wood color is identical for a appealing look and feel. It is dependent on the manufacturer to provide proper complementary stair nose molding. If customized flush molding cannot be found then the installation might need to use overlap molding described below.
Expansion gap considerations are less important for stair tread placement because the amount of material is small and the expansion slight. Still a mall gap should be allowed where the tread meets the riser. This gap would then be covered by the riser overlay. Overlap stair nose molding can be used in combination with flush molding to accommodate transaction at the top of the stairs, where it would be transitioning from a differing floating floor down to the first step.
Flush stair nose pieces are installed by construction adhesive the flush stair nose to the subfloor using. In addition, using two 8 penny face nails, nail down the flush stair nose approximately 3 inches. in from each end as well as in the center of the flush stair nose piece. If the stairs are extra long, make sure to face nail two 8 penny finish nails at approximately every 20 inches of the molding.
Consult the manufacturer's installation instructions for the best results.
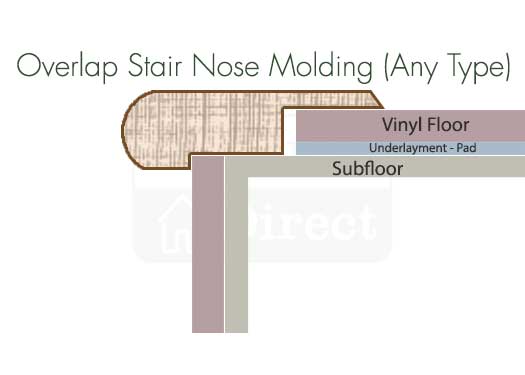
Overlap Stair Nose Molding for Wood or Laminate Floors
Floating applications require a different kind of Stair Nose: one which can allow for the required expansion gap for floating hardwood or laminates. Overlap Stair Noses have a small protruding piece which overlaps the floating floor and hides the expansion gap, leaving room for free movement of the floating floor. As you can't float floor boards on individual stairs, the boards need to be attached to the individual stair surface. Overlap Stair Nose pieces are typically only used at the top of the staircase, where it would be transitioning from a floating floor down to the first step.
Overlap Stair Nose pieces are installed a lot like Flush Stair Nose pieces. Glue the Overlap Stair Nose to the subfloor using construction adhesive, making sure to leave enough room for the required expansion gap. In addition, using two 8 penny face nails, nail down the Overlap Stair Nose approximately 3 inches in from each end as well as in the center of the Overlap Stair Nose piece.
If the stairs are extra long, make sure to face nail two 8 penny finish nails at approximately every 20 inches. of the molding. It's important, with Overlap Stair Nose pieces, that you remember to attach the molding to the subfloor and not to the floating floor you're overlapping.
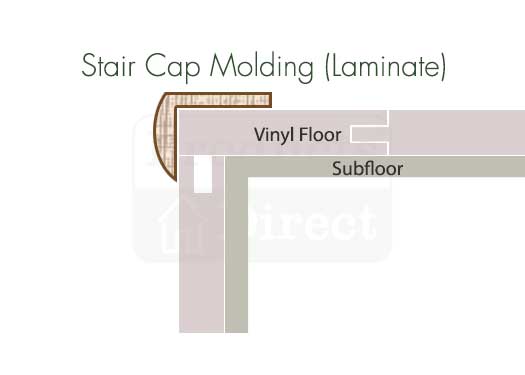
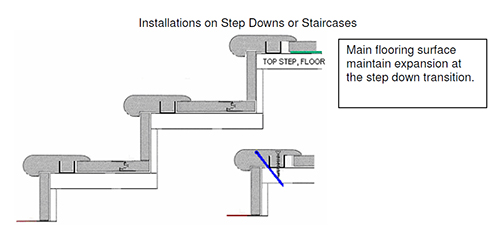
Stair Cap Molding for Wood or Laminate Floors
A stair cap is a simplified approach to cover the stair nose and extend out over the floor on the tread space. The cap will also extend below the nose to cover any transition between the nose and the riser. The diagram shows a simple stair nose that does not protrude out over the riser. Check with the star nose manufacturer for dimensions to be sure it will work for your application.
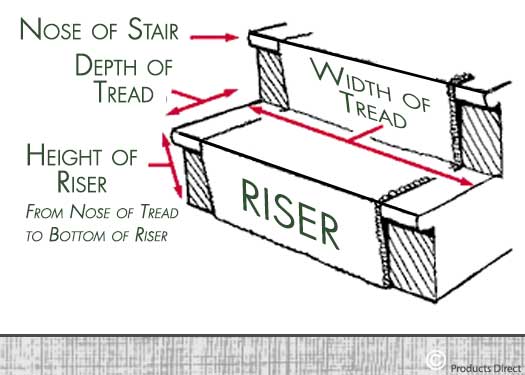
Stair Measurements
The image depicts ways to measure a stairway and the vocabulary used. There are two dimensions to pay attention to in measuring a stair.
- Riser: the upright member between two stair treads
- Tread: the top surface of a step or stair.
Stair Treads
If you want a fast and easy option for tackling your stairs project, consider Stair Treads. A Stair Tread is a whole piece of finished stair which you simply glue and nail down and then you're done. Stair Treads negate the need for Stair Nose pieces and individual floor boards, saving a lot of install time. Also available, are Stair Risers, which are the vertical part of the stair. Most hardwood flooring and laminate flooring manufacturers don't produce Stair Treads to match their products. However, there are independent companies that specialize in Stair Treads and Risers and offer them in a variety of sizes, styles and stain colors. These companies can even closely match a floor if a sample is sent to them.
Last Updated: July 27, 2017